How to Wire a Bonsai Tree: A Beginner's Guide
Learn how to wire a bonsai tree step by step. This beginner guide covers materials, technique, timing, and how to avoid common mistakes that kill branches.
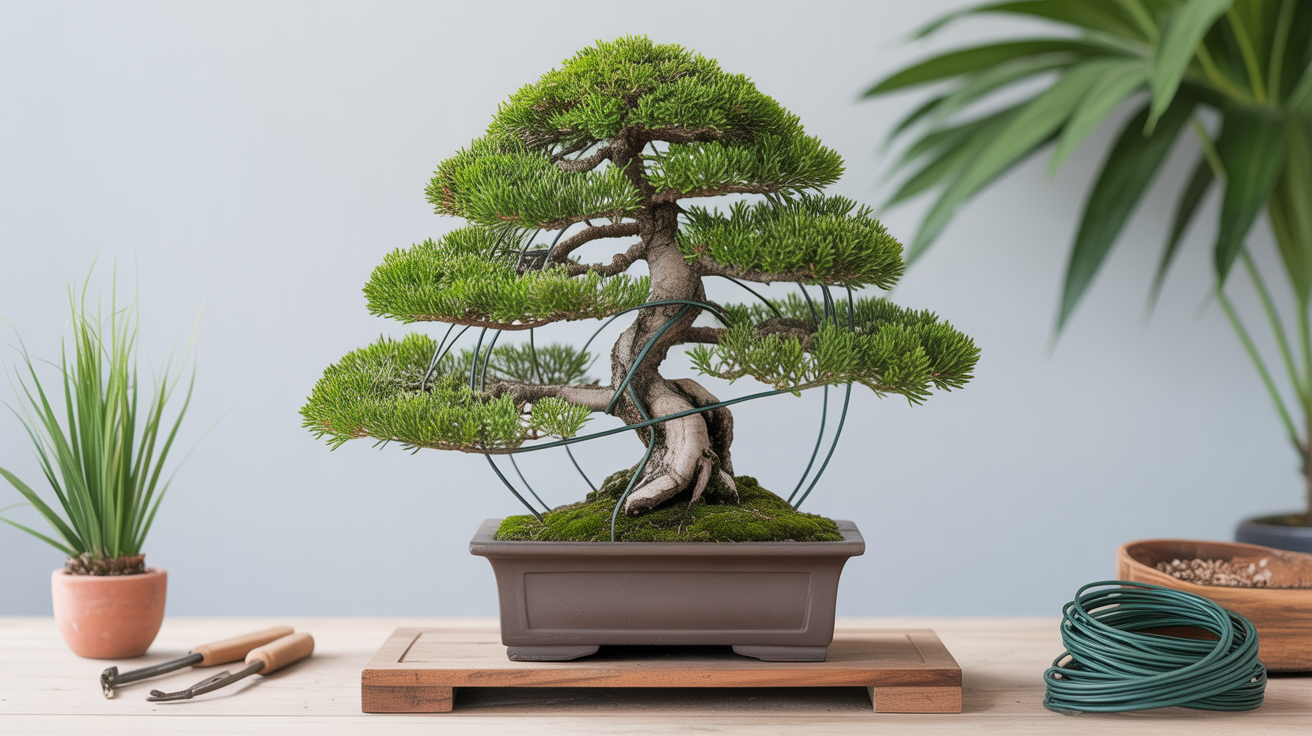
Wiring is how bonsai artists reshape branches and trunks into the positions that make a tree look old, windswept, or graceful. The wire acts as a temporary brace: you wrap it around a branch, bend the branch to where you want it, and leave the wire on until the wood "sets" in its new position. Then you remove the wire and the branch stays put.
It sounds simple. In practice, it takes a few trees to get a feel for it. This guide walks through the whole process for beginners, what wire to buy, how to wrap it, how to bend safely, and when to take it off before it damages your tree.
What wire to use
There are two types used in bonsai: copper and aluminium. For most beginners, aluminium is the better starting point. It is softer and more forgiving, easier to remove without scarring the bark, and available in multi-packs at most bonsai suppliers. Copper is stiffer and holds better on thicker branches, but it is much harder to work with and more likely to cause damage if you are still learning the motion.
The thickness of the wire matters too. A common rule is to use wire that is roughly one-third the diameter of the branch you are wrapping. Thin wire on a thick branch will not hold; thick wire on a delicate twig will flatten it. You will likely need several gauges on the same tree. See the guide on what wire gauge to use on a bonsai for a more detailed breakdown.
If you want to understand the full tradeoffs before buying, copper vs aluminium bonsai wire covers both materials in depth.
How much wire to cut
Cut a piece about one and a half times the length of the branch you are wiring. If the branch is 30 cm long, cut 45 cm of wire. You will spiral the wire at an angle rather than wrapping it straight around, so you use more than you might expect.
When to wire
Timing depends on the species. Deciduous trees like maples are easiest to wire in late winter or early spring, just before buds break. The branches are bare so you can see what you are doing, and the wood is more flexible before the growing season pushes stiffness into new growth. Conifers like junipers can usually be wired year-round, though many growers prefer autumn or winter when growth has slowed.
Avoid wiring a tree that is stressed, recently repotted, or showing signs of illness. Wiring adds more stress. A healthy tree recovers from minor bark pressure; a weakened one may not.
How to wire a bonsai branch: step by step
This is the core technique. Work slowly, especially the first few times.
1. Anchor the wire first. Never start wiring in the middle of a branch. Push one end of the wire into the soil near the base of the trunk, or hook it around the trunk a couple of turns, or anchor it to a heavier branch lower down. If the wire is not anchored, it spins when you try to bend the branch and cuts into the bark.
A common approach is to wire two branches with one piece by running the wire over the trunk between them. This is called double-wiring. The trunk acts as the anchor for both sides.
2. Wrap at a 45-degree angle. Hold the wire close to where it starts and spiral it along the branch at roughly a 45-degree angle. Too shallow (closer to horizontal) and it will not hold when you bend. Too steep (nearly vertical) and it can crush the tissue under the bark.
Keep the wraps firm but not biting. You should be able to slip a thumbnail under the wire if you try.
3. Work from thick to thin. Start at the base of the branch and work outward toward the tip. If you are also wiring bonsai trunk, do the trunk first, then the main branches, then the sub-branches.
4. Bend carefully. Once the wire is on, hold the branch between both thumbs on the outside of the intended bend and your fingers supporting the inside. Apply pressure slowly and evenly. Never twist the branch as you bend; always work with steady outward pressure. You will feel (and sometimes hear) tiny crackling, that is normal. A sharp crack or sudden give means you have gone too far.
For thick trunk work, bending takes more patience. Some growers anchor a separate length of wire to a root and use it as a lever. If the trunk truly will not move without extreme force, consider guy-wires (tying the trunk to the pot rim with padded wire) rather than wrapping.
5. Check the angle and leave it. Step back and look at what you have done. Minor adjustments are fine. Resist the urge to keep moving the wire or re-bending repeatedly, each time the branch moves it stresses the wood in that spot.
Removing the wire before it scars
This is where many beginners lose a tree's aesthetics. Wire left too long bites into the bark and leaves a spiral scar that can take years to fade. On fast-growing trees in summer, wire can cut in within four to six weeks. On older or slower-growing trees, it may last several months safely.
Check your wired trees every two to three weeks during the growing season. When you see the bark beginning to bulge around the wire, it is time to remove it. Do not try to unwind the wire, that risks snapping the branch. Use wire cutters to snip the wire into short segments and lift each piece off.
If you notice wiring marks forming, remove the wire immediately even if the branch has not set. You can re-wire after a short recovery period. The guide on how to apply bonsai wire without scarring the bark covers the technique and what to do if marks appear.
What if the branch springs back?
If a branch reverts partway toward its original position after you remove the wire, it means the wood did not fully set. Wait a few weeks, then re-wire at a slightly different angle (to avoid the same bark area) and leave it longer. Some branches, especially on young trees, need two or three wiring cycles before they hold permanently.
A quick reference: wiring at a glance
| Step | What to do | Common mistake |
|---|---|---|
| Choose wire | Aluminium for beginners; gauge = 1/3 branch diameter | Using one gauge for the whole tree |
| Anchor | Hook to trunk or soil before you spiral | Starting in the middle of a branch |
| Wrap angle | 45 degrees along the branch | Too flat (wire slips) or too steep (bark damage) |
| Bend | Both thumbs outside the bend, slow steady pressure | Twisting instead of bending |
| Remove | Snip into segments, never unwind | Leaving wire until scars have already formed |
Frequently asked questions
Can I wire my bonsai in summer?
You can, but you need to check it more often. Warm weather speeds growth and wire can bite in very quickly. Some growers prefer to avoid wiring altogether during peak summer heat on deciduous trees. If you do wire in summer, inspect every two weeks.
How long should I leave wire on?
There is no fixed answer. It depends on the species, the season, and how fast your tree is growing. The rule is: remove the wire when the bark starts to swell around it. For most trees in active growth, that is somewhere between four and twelve weeks. For conifers in slow winter growth, it might be six months or more.
My wire keeps slipping when I try to bend the branch. What am I doing wrong?
Almost always, the anchor is the problem. If the starting point of the wire is not fixed, the whole coil rotates when you apply pressure. Make sure you have anchored the end securely to the trunk or soil before you begin wrapping.
Does wiring hurt the tree?
Minor pressure from correctly applied wire does no lasting harm to a healthy tree. The problems come from wire that bites in because it was left too long, or from bending a branch too sharply and snapping the vascular tissue inside. Work slowly, check regularly, and remove wire at the first sign of bark swelling.
What species are best for a beginner to practice wiring on?
Juniper, ficus, and Chinese elm are forgiving choices. They respond well to wiring, recover from minor mistakes, and are widely available. Maples and pines are more sensitive and worth waiting on until you have practiced the technique on a less fussy species.